Saturday, July 23, 2011

J turns 5 and wants a "snake cake"

Today was J's 5th birthday. I can't believe my little man is getting so big!

Every year I try to indulge my children by letting them pick out their own cake. This year J wanted a snake. "Ok, I can do that. Do you want a striped snake? A green snake?" I asked. 

Nope, nothing as simple as that.  J wanted a BLUE snake!

So here it is: the Blue Snake Cake:
I used one bunt pan and a loaf pan. I cut the bunt cake in half and placed each opposite sides end to end. I then cut the loaf sized cake into a diamond-y shape. I used the leftover corner pieces and one reserved end of the loaf for the tail. I then frosted the cake (in homemade butter cream frosting- YUM!) and decorated it. The stripes are made from dyed sugar. The tongue is a fruit roll-up and the eyes are jelly beans.
It's not  my best frosting/decorating job- I realized that I only had a 1/2 hour until the party and had to frost rather quickly-but J loved his cake.

E and J sneak a few licks of frosting after the party!

Saturday, July 16, 2011

Running: Take 3

I love my Brooks!
I went for a run this morning and it felt GOOD! Weird, I know. I am definitely not a runner by nature. I tried to get into last summer and did it every few days for about 2 months. That seems to be my normal attention span for working out. Turbo Jam, yoga, running, walking.... I do really well for the first two months but then usually get frustrated with the lack of results.

This spring I decided, again, to start running. Or jogging/moving as I referred to it. Slowly, week by week I knocked off a few seconds, then minutes off of my mile time. I felt good. And while I wasn't loosing weight (that darn muscle mass!), I could tell that I was in way better shape. 

Then I ran a 10k at the beginning of May and suffered a horrible shin splint. Yup, a shin splint. I didn't listen to my friend who was a track coach  and tried to run too far too soon. I tried a couple of more times in May but I soon fell back into my rut of meaning to work out, but not ever actually doing it. At least I lasted 3 months this time!

So here I am again, trying to get back into the swing of things. We'll see how I fare these next two months :) Luckily for me I have all of these friends who irritate inspire me with their utlra cute bods and fitness-y ways. Wish me luck!

Friday, July 15, 2011

E's new outfit


Apparently I am on a sewing kick. I found this fabric on sale (.90 for 2 yards) and created this top. E had a pair of jeans that had holes in the knees so I decided to turn them into a pair of cutoffs with a cute fabric cuff. As usual, I didn't follow a pattern, but I did sketch it out and write down what I did as I sewed. 

 Here's what I did:


*Measurement based off E, who wears about a size 7 or 8. Her chest measures 26 inches around. Seam allowances are generally 1/4" (sometimes 1/2 depending on my lack of paying attention).


Bodice: 13" x 45"
2 Straps: 3" x 8"
Bottom panel: 4" x 45" (if you don't like panel, cut the bodice panel to 15")
 Cuffs for shorts: 2 pieces 4" x 11 1/2".  Measure the openings of the legs after cutting off the bottom of the pants. I cut about a 1/2" above the holes in the knees).


Bodice: 
Turn top edge of piece under 1/4" twice (to form a finished edge) and topstitch. 

Change bobbin to one with elastic thread for shirring. I learned how to shirr from Sandi Henderson's tutorial via Sew Like My Mom.
Measure 1/2" down from topstich. Shir across the length of the bodice. Back stitch a few times at the beginning and end. After the first row I move my needle to the left, then use the edge of my presser foot as a guide for the remaining 9 rows. This leaves about a 1/4" space between each row. Blast with steam once you are done to help the elastic thread shrink up (I've been having some issues with my iron and its steam function! Hopefully yours works better than mine). Tie ends of elastic thread together.
Fold in half, right sides together and sew along raw edge. 


Straps: 
Fold 3" x 15" in half lengthwise, right sides together. Sew along raw edges to for a tube. Turn right side out. Press so that seam is to one side (or in the middle which is what I usually do). 

Find middle of shirt.Measure out 2" from middle on each side. Pin straps in place ( I actually did this by having E try on her top and then pinning them into place).  Top-stitch each strap in place along your first row of shirring.

Later I noticed that the top ruffle was falling away oddly from the straps so I went back and top-stitched along the top seam. It looked much better. 

For placement of the straps in the back I had E try on the top once again. After crossing the straps I pinned them in place and top-stitched them (after E had taken off the top- 'cause that would have really sucked for her if she hadn't taken it off).


Bottom Panel:
Fold in half width wise and sew raw edges together to form a circle. Fold the top edge down to meet the bottom edge so that you have a 2" tube of fabric, right side out. Press .
Pin to raw edge of bodice, right sides together. Press seam allowance upwards. Turn right side out and top-stitch close to seam.

Shorts:
Cut off a pair of jeans. I cut just above the holes in the knees. Set aside. Fold the 4" x 11 1/2" strips in half width wise and sew raw edges together. Press seams open. Fold top edge down to meet the bottom edge, just like you did with the bottom panel of the shirt. Pin the right sides of the jeans and fabric loops together and sew around the edge (This is a huge pain. I was almost tempted to hand stitch the darn things after I did the first leg).  Press seam allowance upward. Turn right side out. Top-stitch close to the seam. Repeat with the other leg.  These cuffs can be folded up to hide the top-stitch or left down.
This outfit didn't really take that long to make. In fact, the longest part was the pant legs. But that was mainly due to E and J wanting to sew also. I spent a lot of time threading needles and showing them how to make a basic stitch. 

Please disregard the mess in the background- I chose to sew last night instead of doing the dishes :)

Thursday, July 14, 2011

Chicken and Rice Enchiladas

Enchiladas before being baked
 Chicken Enchiladas ~ serves a lot, as I almost doubled the original recipe so I could bring dinner to one of my friend who just had baby #4!


Ingredients:
- 4 to 6 chicken breasts                - 14-16 tortillas
- 1 can corn                                 - 1 large can enchilada sauce
- 1 can black beans                      -  1 cup (or more)  shredded cheese
- 2 cups salsa                                    cheddar or monteray jack
- 1 cup uncooked rice

Directions:
1. Option 1:  Place chicken in a deep skillet. Cover with salsa. Add a little water if needed to entirely cover the chicken. Place lid on skillet. Poach chicken over medium heat until chicken can easily be shredded.
1. Option 2: In the morning throw frozen chicken breasts into a crock pot (this time I used a combination of breasts and thighs). Cover with salsa. Add about 1/2 cup water.  Cook in crock pot 6-8 hours on low.
2. Prepare rice according to instructions on bag/box.
3. Shred chicken in large bowl (make sure to remove any bones/cartilage if you didn't use boneless). Add some of the salsa liquid.

4. Combine cooked rice, corn, and beans with the chicken. Mix well.

5. Warm up tortillas in microwave for 15 seconds.  Preheat oven to 350 degrees.
6.  Spoon about a cup of the chicken rice mixture into the middle of the tortilla.  Drizzle 1-2 tablespoons over the mixture. 
7. Roll tortillas up. Place in baking dish, with the seam of the enchilada facing down.
8. Continue until all tortillas and/or chicken mixture has been used.
9. Cover with remaining enchilada sauce. Sprinkle cheese over enchiladas.
10. Bake for 20 minutes, or until internal temperature reaches 140 degrees.

Ok, so I still need to work on my plate presentation! But they tasted great!
Garnish with a dollop of sour cream.  I quickly realized that I accidentally grabbed a can of spicy enchilada sauce- oops! The sour cream was very helpful for cutting the heat.  E loved it, J still thought it was too spicy.

I found a recipe online from a brand-name rice company and decided to tweak it a little. I think the next time I make it I will add some of the cheese to the chicken mixture. We like things cheesy!

Tuesday, July 12, 2011

My most recent boredem buster

I whipped up a new dishcloth for myself last night. I had some pretty yarn left-over from making my cousin a dishcloth, so I had to tweak the pattern a little. The pattern is super easy:


REQUIREMENTS
1 ball of knit worsted weight cotton (Sugar N’ Cream) 50 gm size
Size 9 to 10 1/2 needles

DIRECTIONS
Cast on 4 sts. Row 1: Knit one row.
Row 2: K2, YO, knit to the end of the row.
Repeat row 2 until there are 40 sts
Next row: K1, K2tog, YO, K2tog, knit to the end of the row.
Continue decreasing until 4 sts left. Cast off.


 I had about 1/2 of a ball left (I forgot the name of the color, but it was by Sugar N' Cream) and I used size 9 needles.  Because I was running low on yarn I starting decreasing after I had 35 stitches.

I found the pattern at Dish and Wash Cloth Mania.  Can't wait to try some of the other neat pattern!


Monday, July 11, 2011

Rash decision #751- Tomato Chutney


Well it is a good thing I live about 5 minutes away from a Wal-Mart! As usual, my rash thinking forced me to take a quick trip once again to prevent a total failure on my part.

See it started like this:  A restaurant I use to frequent closed recently. I was totallly bummed because they had this sandwich- the White Cheddar Chutney Chicken Burger (say that one five times, fast!).  It was so good- cheesey, tart and sweet from the chutney, and delightfully messy.

I decided to try to recreate my favorite dish. I found a really simple recipe for tomato chutney on  Veggie Mama, bought all my ingredients for the burger, and then forgot about it.   Fast forward about a week. I spotted the yummy San Marzano tomatoes hiding in my cupboard and decided that tonight would be a great night for the White Cheddar Chutney Chicken burger.

I pulled up the recipe, got all my onions and garlic chopped, added them to the big pot of tomatoes and other stuff and sat back and enjoyed the delicious aroma wafting from the pot.

Glancing back at the recipe, I scrolled down to see if Veggie Mama had any thing else.  That's when I saw step 3.  Yes, in my haste to get rolling on the chutney, I had forgotten that this was suppose to be canned.

Ok. I could handle this. Sure, I didn't have any legitimate canning stuff, but who needs that? I had on hand three large canning jars that had held dry cookie and brownie mix. One of them might have had fruit in it at one time, but they all looked like they would still work.

I washed 'em up and threw them in my largest stock pot to sanitize away in hot water.

While I was waiting for the jars, I decided to use my most trustworthy source of information, GOOGLE, and find out how exactly one went about sealing jars using the water bath method.

Turns out that your water needs to cover the tops of your jars, and from what I was able to infer, you can't tip your jars on their side to get them to fit under the water. Hmm... this was going to be a problem as this was precisely what I had done in order to sanitize them. The jars were at least an inch taller than the stock pot and there was no way I could get them to fit, especially since I had to put my trivet on the bottom of the pot so the boiling water could move freely under the jars.

Luckily for me, my chutney still had 45 minutes left to simmer. I threw E and J in the car (who were soaking wet as they had been playing outside with water balloons) and raced off to Wally-world.  I found some nice little jars and bought the right kind of tongs to lift my full jars in and out the water.

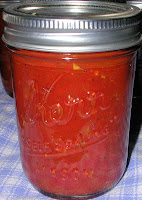
I made it home with just enough time time to wash and sanitize all my new jars and lids.  Ladled up the chutney and place all my new short jars in my stock pot. Here's  a picture of my final product:


So now I'm waiting to see if all my jars are sealed.  I might have tested a few lids too early. Turns out you're also suppose to wait 12-24 hours before testing the seals. oops. Hopefully they will end up sealing or we will be refrigerating at least 4 jars of chutney!

Oh, and did I mention that I will be making another run to Wal-Mart later this afternoon to pick up hamburger buns?

Friday, July 8, 2011

SEW easy ;-)

Suzy-Q- Homemaker here again...

I finally found some great fabric for an apron pattern I bought two years ago. The pattern was easy to follow and the apron turned out pretty cute. Need to make a few adjustments ( I always forget to try things on before I stitch pieces together- too impatient) like shortening the straps.

The fabric is by Amy Butler. It's called "Sari Blossoms."  The pattern is the "Lilly Apron" by Busy Bee Quilt Designs. 


Now I need to find something else to do with my time...

Wednesday, July 6, 2011

A little free-form sewing

So every summer I bust out my sewing machine and make E a top or a dress. I've gotten progressively better- my first dress I sewed for E two years ago can only be classified as a disaster. No kidding, it was that bad.  This year I found some cute red and white fabric on sale (.90 for 2 yards!) and decided it was time to make E her latest ensemble.

Instead of using a pattern, I decided to be inspired by a skirt E's grandma made for her. I cut and sewed a few rectangles together, copied the top from another dress pattern and sewed it up. E added her opinion on the alternating fabric. It ended up like this:
It isn't perfect, but it is way better than the first dress I ever sewed!  The back looks like this:

I wanted to make the straps criss-cross in the back, but E said it would be too baby-ish that way. I also added some shirring to the back to tighten it up.   I suppose I could have fitted it on E before sewing it all together, but I tend to do all my sewing late at night after bedtime and didn't want to wait until morning!

So there you go! A one of kind ruffle dress for my one of a kind E!


Tuesday, July 5, 2011

4th of July: over-indulged kids

I normally love love love the 4th of July. I'm a big kid at heart- fireworks make me smile. This 4th we didn't stay up to watch the fireworks because E and J were pooped out from spending all afternoon carousing around Riverfront Park.  I did have a lot of fun hanging out with my kids, even if I didn't get to watch my precious fireworks.
My m.i.l. suggested we picnic at the park, walk around and look at the booths, and go on the little rides in the Pavilion.  She had seen on the news that day passes were 1/2 off.  We ate a great lunch by Spokane's art/play equipment known as the "Big Red Wagon." E and J had fun going down the handle/slide and climbing up on the wheels.

Even H was in a relatively good mood. He was willing to smile (sort of) for a rare photo of us.


  We didn't reach the Pavilion until 1:30. Turns out the day passes were only on sale for until 1:00 pm.   So my m.i.l. bought one for each kid. E and J had a blast.  They went excitedly from ride to ride. The adults (including my brother-in-law and his girlfriend) sat and people watched. There are some strange people in the world...

The line for the Octopus and the Ferris Wheel were quite long.  H declared that the kids (ahem- HE) was not going to wait in those lines.  So we decided to go peruse the booths along the walkways.

The booths were AMAZING!!!


Ok. I lied. There wasn't anything good going on. However, we did see a clown making lame balloon animals which cheered up the kids, I sucked down an over-priced strawberry lemonaid (4.00 for a 16 oz?! Rip-off) and my brother-in-law nabbed himself a rad American-flag gun balloon.
We ended our family excursion by letting the kids ride on Spokane's historic Looef Carousel. It's amazing!
We parted ways with H's family and let the kids go on a few more rides and saw an IMAX movie,Born to be Wild.  Very cute! We then hit up Cyrus O'Leary's for dinner. I'm pretty sure E and J had a lot of fun. J fell asleep in the car as soon as we left the parking lot.

Maybe next year the kids will manage to stay up for the fireworks!

Saturday, July 2, 2011

A different kind of burger for basil lovers!

Now that summer is here and I am finally done with work, my  "Suzy Q Homemaker" side is starting to show again.  I spent most of June deep-cleaning my house (despite what H. thinks, picking up is not the same as cleaning!)  and catching up on my reading list, but now I am bored. I'll admit it, my kids do keep me busy. Between E's summer soccer, play dates, and J just being plain  ornery, I shouldn't have that much spare time.

But I do.

So I have been delving into my Food Network 'zine (if you don't subscribe- do it! Great recipes that aren't that hard to make) and making some pretty darn tasty stuff.

Like last night. 

Food Network declared August to be "Basil" month. They list off a ton of different ways to use basil.  One was the Caprese Burger.  Roughly chop some basil, mix it in with your hamburger meat, top with mozzarella, tomato, and additional basil.  SOOOO YUMMY!  Of course, I like to jazz things up and only follow recipes exactly when I bake (after all, baking is a science) so I altered my recipe.  When making my patties, I added a few glugs of balsamic vinegar.  I also tucked a small piece of mozzarella in the middle of my patties.  When grilling the burgers, I added a little bit of seasoning salt.  These burgers earned tons of praise from my two darling children and a grudging "yeah, these are really good" from H, who "let" me use his grill.

These will definitely be made again.